- Remove the Old Chain (if applicable): If you’re replacing an existing chain, use a chain breaker tool to remove it. Locate the master link or connecting link, and use the chain breaker to push the pins out. Once the old chain is removed, clean the sprockets and the area around them.
- Prepare the New Chain: Make sure the new minibike chain is the correct length for your bike. You may need to use a chain breaker tool to remove any excess links if it’s too long. Consult your minibike’s manual for the recommended chain length.
- Thread the Chain: Position the new chain around both the front and rear sprockets. The chain should sit on the sprockets with even tension.
- Connect the Chain: If your chain comes with a master link or connecting link, use pliers to snap it into place, connecting both ends of the chain. Ensure that the clip is securely attached and facing the correct direction. If your chain does not have a master link, you’ll need to use a chain breaker tool to press the pins back in and connect the ends.
- Adjust Chain Tension: Proper chain tension is essential for safe and efficient operation. Consult your minibike’s owner’s manual for the recommended chain tension. Typically, there should be some slack in the chain, but it should not be overly loose. Adjust the rear wheel position to achieve the correct tension.
- Tighten Rear Wheel Axle Nut: Once you have the chain tension set correctly, tighten the rear wheel axle nut using the appropriate wrench. Make sure the rear wheel is properly aligned and centered in the frame.
- Check Everything: Double-check that the chain is properly connected, the chain tension is correct, and the rear wheel is aligned. Make any necessary adjustments.
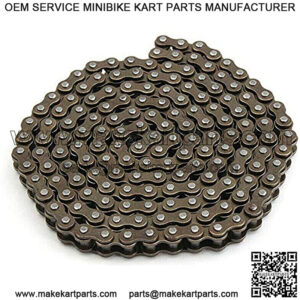
coleman mini bike chain